Steel Reinforced Concrete System
The Steel Reinforced Concrete (SRC) Panel System is a composite sandwich type structural panel that offers a modern alternative to traditional concrete hollow blocks (CHB) as a building material. It is composed of high tensile wires densely welded together, an expanded polystyrene (EPS) core, and concrete panels for the exterior faces.
The steel reinforced concrete panels provide both tensile and compressive strength, ensuring the structural integrity of the system. The EPS core acts as a separator and stabilizer, preventing buckling under edge-wise compression, torsion, or bending. Additionally, the core serves as thermal and acoustic insulation, enhancing the overall comfort of the building.
Compared to CHB construction, the SRC Panel System is lightweight and economical, offering numerous benefits. It allows for faster construction, saving time and labor costs. Moreover, it provides a much safer structure due to its enhanced strength and stability.
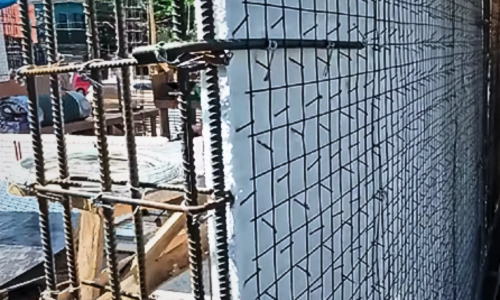
The Steel Reinforced Concrete (SRC) Panel System is an excellent choice for walls, roofs, and floors, offering a superior alternative to Concrete Hollow Blocks (CHB). The panels consist of a lightweight core made of expandable polystyrene sandwiched between smooth welded wire fabrics. These wire fabrics are held together by spreader wires that are pierced through the polystyrene core and welded on both sides.

One of the key advantages of the SRC Panel System is its ease of installation. The panels are lightweight and easy to carry, making them convenient to handle during the construction process. They can be used for both load-bearing interior and exterior walls, as well as for roofing and flooring materials.
When fully installed, the combination of the polystyrene core, steel mesh, and mortar plaster provides a robust structure. These components work together to enhance flexibility and resistance against seismic and wind forces. This makes the SRC Panel System more resilient and capable of withstanding earthquakes and other natural forces compared to traditional construction methods.

With the SRC Panel System, you can build beautiful homes that not only have an aesthetically pleasing design but also offer superior structural strength compared to traditional concrete hollow blocks (CHB). Each panel of the SRC Panel System undergoes a unique and special process that ensures exceptional quality.
The strength of the SRC Panel System surpasses that of CHB. The combination of the steel-reinforced concrete panels and the special manufacturing process results in a durable and robust structure. These panels are designed to withstand various external forces, providing enhanced safety and longevity for your home.
In addition to its structural superiority, the SRC Panel System offers excellent acoustic and thermal insulation properties. The EPS core within the panels acts as insulation, reducing noise transmission and maintaining a comfortable indoor environment. It helps to keep cool air inside the house even after the air-conditioning has been turned off, contributing to energy efficiency and cost savings.
Materials of Steel Reinforced Concrete (SRC) Panel
The Steel Reinforced Concrete (SRC) Panel System is a versatile wall board that consists of several components working together to create a solid structural formation. These components include styrofoam, welded wire mesh, slant wire, and mortar plaster.
The styrofoam acts as the lightweight core of the panel, providing insulation and reducing the overall weight of the system. It helps to enhance the thermal and acoustic properties of the walls, roofs, and floors.
The welded wire mesh and slant wire are essential for reinforcing the panel. They provide strength and stability to the structure, ensuring that it can withstand various loads and forces. The mesh and wires are securely held together, forming a sturdy framework.
To complete the system, mortar plaster is applied to the panel’s surface. This layer of plaster helps to protect the inner components, adds an additional layer of strength, and provides a smooth and finished appearance to the walls, roofs, or floors.
The combination of these components in the SRC Panel System creates a reliable and durable structure suitable for building walls, roofs, and floors. The system’s design and construction ensure that it performs well in terms of structural integrity, insulation, and aesthetics.
Specifications
| Styro Thickness | 1.50”, 2.00”, 2.50”, 3.00”, 3.50”, 4.00” |
|---|---|
| Length of Panel | 2.40m up to four (4) meters |
| Wall Thickness | 100mm to 150mm |
| Core | Expanded Polystyrene (EPS) Fire retardant grade Core |
| Density | 17-18kg/m3 |
| Wire | The Panel System utilizes high tensile black iron, which conforms to ASTM designation A-82 and ASTM designation A-105.This material is a welded steel fabric with an ultimate tensile strength (fy) of 100,000 psi. |
| Wire Diameter | Longitudinal: 2.0mmTransversal: 2.0mmJoint/Spreader: 2.3mmSpacing of Squares: 50mm X 50mmSpacing of Spikes: 50mm X 105mm |
| Accessories | The Panel System incorporates various types of mesh, including flat mesh, angle mesh, and U-mesh.These meshes meet all building codes for both residential and commercial construction. |
SRC Panel Erection and Installation Process
The erection and installation process of SRC (Steel Reinforced Concrete) panels involves several steps to ensure a secure and durable structure. Here is a general guide to the process:
I.SITE ORGANIZATION
In a typical construction process, the following equipment and tools are commonly used:
Cement Concrete Mixer: A cement concrete mixer, often referred to as a “1-bagger,” is used to mix cement, sand, aggregate, and water to create concrete. This mixer ensures a consistent and uniform mixture, which is essential for construction projects.
Lifting Equipment: For high-rise construction projects, lifting equipment is used to handle materials and equipment. This may include cranes, hoists, and elevators, which are essential for moving heavy materials and equipment to higher levels of the building.
Concrete Sprayer/Shotcrete Machine/Manual Application: Depending on the construction requirements, concrete may be applied using different methods. A concrete sprayer or shotcrete machine can be used for large-scale applications, while manual application with tools like trowels and floats is suitable for smaller areas or detailed work.
Scaffolding and Supports: Scaffolding is a temporary structure used to provide a safe working platform for construction workers. It is commonly used for tasks such as plastering, painting, and bricklaying. Wood or metal supports are also used to provide additional support for slabs and roofing during construction.
Manual Tools: Various manual tools are used for installation and cutting purposes in construction projects. These tools include hammers, screwdrivers, wrenches, saws, drills, levels, and measuring tapes. They are essential for tasks such as assembling and installing building components, cutting materials, and ensuring accurate measurements.
Also Read:
- Formworks
- Chicken Mesh for Plaster
- Box Culvert Reinforcement Layout
- Steel Deck Installation and Construction
- Concrete Stairs Reinforcement Details
- Shotcrete
II. CONSTRUCTION PROCEDURE
A. WALL FOUNDATION/FLOOR SLAB
In the construction procedure, the first step is to establish the wall foundation or floor slab. There are two common types of foundations that can be used:
- Grade beam with small dimensions (200mm width x 300mm depth)
- Directly on the ground floor or on a suspended slab that is supported by beams
Depending on the soil test conditions, the use of SRC (Structural Reinforced Concrete) panels can be incorporated into any conventional or standard method of wall construction. The soil test helps determine the type of foundation and construction method suitable for the specific soil conditions.
B. DOWELS
The foundation layer has anchor bars, also known as re-bars, installed along its external edges. A 10 mm x 600 mm dowel was positioned alternately on both sides of the SRC panel at intervals of 300 to 400 mm. Tie the dowels to the wire mesh using a Ga 18 tie wire. These dowels will serve as supports or anchors for the SRC panels.
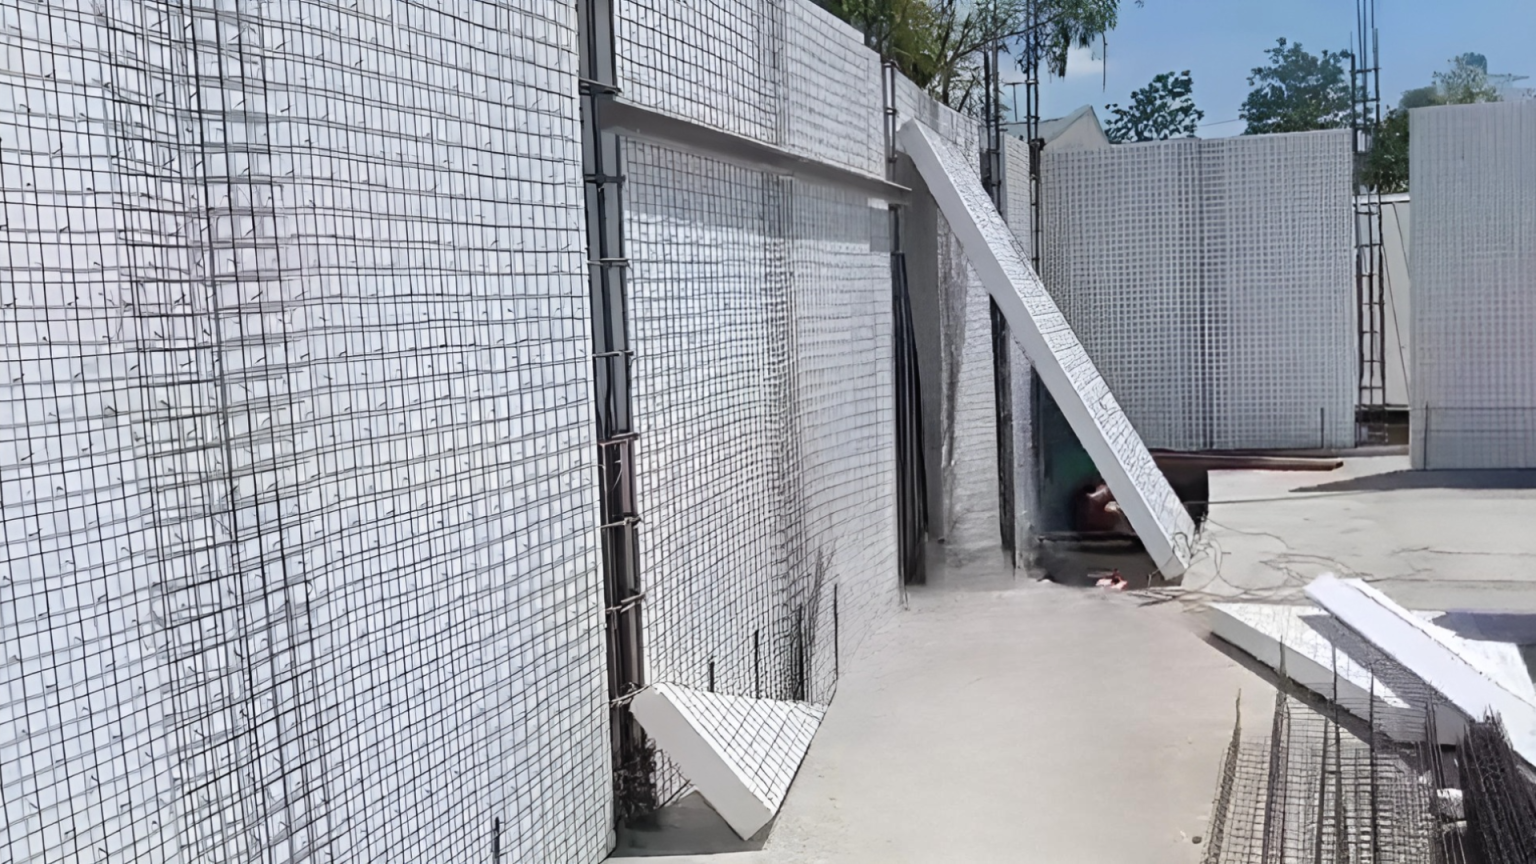
C. ERECTION OF SRC WALL PANELS
SRC panels are installed in a systematic way following the wall profile, as specified in the drawings or plans, and are linked to pre-arranged anchoring bars or dowels. Ga 18 GI tie wire is used to tie the SRC panels on both sides of the wire mesh mat.
FLAT MESH: Flat mesh connectors are used between two panels on both sides. They are tied with Ga 18 GI tie wire. The purpose of these connectors is to provide extra strength and reinforcement between the panels. They also help prevent cracking of plaster, ensuring the overall durability and stability of the structure.
ANGLE MESH: Angle mesh connectors are installed in all corners of the SRC panel structures. These connectors can be in a vertical or horizontal position. Like the flat mesh connectors, they are also tied with Ga 18 GI tie wire. The angle mesh connectors serve multiple purposes. They provide additional reinforcement and strength to the corners of the panels, which are vulnerable to stress and potential cracking. Additionally, they help prevent cracking of plaster in these areas, ensuring the longevity and aesthetic appeal of the structure.
U-MESH: U-mesh connectors are used in all borders of windows and door openings. These connectors provide extra strength and act as holders for jambs and frames. They help prevent cracks in these areas, ensuring the stability and integrity of the openings. Like the other connectors, U-mesh connectors are also tied with Ga 18 GI tie wire.
D. ALIGNMENT
Once the SRC panels have been placed, they are aligned and plumbed with rigging bars and wood for support. Depending on the construction plan chosen, they could be positioned inside or outside the building.
E. SRC PANELS USED AS FLOOR SLAB AND ROOFING
The same instructions for installing vertical panels apply. In order to provide extra support at the base of the slabs and roofs, temperature bars should be affixed to the floor/roof beams and the panels joined together. These temperature bars provide additional strength while bending. The building’s usage and occupancy, as well as the design work done by the structural engineer of record, determine how far apart these bars should be spaced. These panels function as unidirectional slabs, with the longitudinal panel running along a shorter span of the area to be covered. Interior beams/support for floor panels should be built around the structure’s perimeter, including partition areas in some circumstances. For slabs and roofs, shoring support is necessary to prevent PANEL deflection during concrete casting.
F. ROUGHING-INS
Using hot air or any basic cutting equipment, polysterene is melted or cut during the installation of electrical, plumbing, heating, and other systems. This is carried out before the plastering stage and following the full installation of the panels. When dealing with hard pipes, it is possible to cut up the mesh and then insert the pipe into polysterene or styrophor. The restoration of the afflicted region through the use of reinforcing mesh is crucial.
G.PLASTERING
WALL PLASTERING: The structural plaster’s grain size ranges from 0 to 5mm. Once cured, its resistance has been measured to be around 19.60 MPa, or around 2,844 psi. Prior to plastering, the following checklist should be completed:
- Examine the vertical installation.
- Make sure the panel is aligned.
- Check the dowel provisions and structural bracing.
- Examine the connectors (u-mesh, angle mesh, and flat mesh).
- Restore any wire mesh cuts made during the rough-in installation process.
- Apply the first plastering on the external side of the wall and allow it to settle for a day before applying the second plastering or plain cement finish.
- Sand mixture with cement at a mixed ratio of 1:3.
SLABS: Prior to plastering or casting in place of concrete, the following list of tasks should be completed:
- Examine the levelling of the horizontal installation.
- Check the SRC panel’s anchorage to the girders or floor beams that support it.
- Make sure of the placement of all connectors and reinforcing bars.
- Reattach the wire mesh that was cut during the installation of the rough-in.
- Examine the shoring support to prevent the SRC panel slabs from sagging.
- Apply the first coat to the bottom portion of the slabs and let it dry for a day before applying the second final plastering.
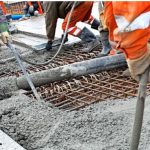
- Pour concrete over slabs using 3/8″ or 3/4″ crushed gravel that is the appropriate thickness.
Related posts:
 Concrete Works: Process & Applications
 Earthworks in Civil Engineering Projects
 Plumbing Works in Residential Construction
 Masonry Works in Building Construction
 Surveying & Transportation Engineering
 Plumbing Traps: Types & Functions
 Types of Sewer Pipes & Their Uses
 Kitchen Sink Types & Material Options